2013/12/12

World details

Our game's world is based on metal. The lifeforms developed according to this, so we have created our own circle of life and have organic metals. For example, a chitin-like material is as common in their world as keratin is in ours - it's mostly a layer of defence, but it may even be the base of a plant's body.

Many plants that can be found in this metal based game world are similar to plants we are used to, the only difference is how they accommodated to the nature of the world. This might not explain much right now, but some of the questions will be answered through the actual game.

Next, I'll tell you about a gameplay element we're currently working on.
"Human" intervention is causing the metal based planet to change, similarly to how Earth may have changed in history.
The temperature became vacillating, which created bigger thermal expansions, so the planet's surface cracked and shattered in some places. It's important to note that the magnetic effect is the strongest one on the planet.

The Chasm:
There are two notable chasms on the opposite sides of the world. In these chasms the magnetic field is enormous. Most things levitate in the air, or orbit around bigger objects. The magnetic field affects everything nearby, again, since everything is based on metal. Even the living organisms have large amounts of metal inside them - everything they consume or inhale contains some metals. At the bottom of these chasms the magnetic field is so strong that it could tear nearly anything apart.

There exists a metal that generates a magnetic field under pressure. The greater the pressure, the stronger the field. With bracelets made of this metal worn on the hands and feet, and a belt worn on the waist, the ability to hover becomes possible. The bracelets and the belt need to be connected with a rubber-like tight rope, so that the farther the user holds their limbs from their body, the higher they will begin to levitate.


Lastly, the technology in this world is simple. Some would even say it's steampunk, and they wouldn't be far off. More details on this will come clear in the future.

In the next posts to come we'll write about more gameplay mechanics.

Have a nice day!

2013/12/10

Fennec fox

Hello, it's Lussy.

In this post, I'll introduce one of our more important characters, the fennec fox. Designing and creating her is mostly my job.

The fennec fox is a merchant who has a shop. She's about 30-40 years old, concentrates mostly on business and money, and the thing she's most fond of is her gun. She will occasionally hire fox, and in some parts of the game, she'll act as fox's sidekick, occasionally helping him out, but mostly just doing her own thing.


Her technical specifications will be the same as fox's: a regular and a cinematic model.


Thanks for reading, have a nice day!
It is still undecided, but she might be controllable in the game at some point.

2013/12/01

Trailer!

Done!


Or at least it's...well, we uploaded a working game trailer. Although it probably raises more questions about the game than it answers, right?

The video was recorded with the UDK. It wasn't easy, however, we managed. Then came the editing part and we lost many lives on the battlefield. 
By Wednesday we had every scene for our game's trailer ready, but we just couldn't deal with the video editing software that crashed, didn't cooperate or the output video lost its quality. So after hours of useless rendering and low-quality previews, we got the final video... not something we're very proud of, but a promise is a promise and we uploaded our game trailer for that reason.

Not to worry, as we asked our proofreader and hero, Maffy, to make use of her awesome video-editing skills to help us out. So you can expect the same video in much better quality soon.

The next couple of times you can expect in-game footages and explanations of gameplay elements, and of course the regular posts we've had 'till now. The in-game footages will take much less time to make (and will probably be un-edited). We realized that video editing isn't our strong point yet, but we can show you a natural view of the game too.

Have a nice day!

2013/11/25

Hi!


Currently we're working on a video trailer for the game. It will be finished and posted later this week.
Until then, stay tuned!

2013/11/14

Pictures of our progress 02

Hi, I'm Geril. I'll just post a few pictures again so you can see how the project's going. You can expect more of these posts regularly.


Since my English isn't very good, Lussy's translating and putting all the posts together.

Have a nice day!

2013/11/12

Short post: Writing system

Hi, I'm Lussy.

In this really small post, I'd like to talk about another thing we're planning on putting in the game: a writing system. Since creating a whole language for the game would take way too much time, we decided to only create a writing system. I'm the one who's working on it, because I love learning and studying languages.

There's going to be two versions of this system; a simpler version that almost everyone can learn (although the analphabetism rate is high in the game's world), and a more complex version, used only by a few well-educated people.

The simple version is based on the Latin and the Korean alphabet, and it's quite easy to figure out. The complex version is inspired by the Korean, Japanese and Chinese writing systems. If you look at these examples, you can see why the simpler one is more well-known among the people of this wild, dangerous world:


When creating each character, I first start with something complex, and I write it down by hand hundreds of times, so in the end it becomes something that comes naturally, and isn't tedious to write down.

You can be sure that it is going to play a part in the game. If someone takes the time and trouble to try and decrypt the characters, they might unveil in-game secrets.

That's about it for this post. Since it is so short, I didn't want to bother our proofreader, Maffy with it (by the way, Maffy, THANK YOU). I guess you already figured out that we are Hungarians, so our English isn't perfect. Sorry about that.
Have a nice day!

2013/11/05

Tutorial: Making "cheap" grass, from Blender to UDK

Hi, I'm Geril, and in this tutorial I'm going to show you how to make a static environment object in a step by step tutorial using Blender and the UDK. In this case the object is a patch of grass.

First, we need a mask. A mask is a black and white image on which white means visible, and black means invisible. The image should have no grey, only black and white. The one I'm using is 512*512 pixels. (Unreal 3 only recognizes binary numbers for resolution. So: 64*64, 128*128, 256*256, 512*512, 1024*1024, 2048*2048)
Other than the mask, you also need a diffuse texture that shows on the surface of the grass. Right now I'm using one that isn't an actual grass texture, but of course it's better to create your own or select one from the UDK's files.
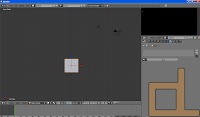
Open up Blender (v2.63 is what I'm using). In the 3d view the first thing you see is a cube that Blender loads on startup. We don't need this cube so you can delete it. The basic controls are: middle mouse button for rotating the view, and shift + middle mouse button for moving the camera.

Load your texture in the UV/Image editor section. In the 3D view, add a simple plane: ADD/MESH/PLANE. From this point on, we're going to edit the plane in edit mode. 
Press Tab to enter edit mode.

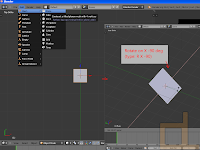
Let's rotate the plane 90 degrees on the X axis.


To do this precisely, press R, X and then type 90, otherwise just use the 3D rotate manipulator.

After this is done, we'll unwrap the UV of the plane on the texture. Just select all the vertices (with shift you can multi-select), the press U and then Unwrap. Since the plane is really simple, its UV won't be too complicated.


The plane needs to be a little lower on the Z axis, so let's move it. Select all vertices, then press G to grab it. If you press Z after G, the plane will only move on the Z axis. Also, holding down CTRL whilst moving the plane will make it move according to the grid, and shift will slow the movement down. Make it so that the plane is a little under the X and Y axes, so it won't float over the ground.


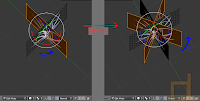
Unless the player has no chance to go near it or look at it from different angles, a single plane doesn't make our grass believable at all, so let's duplicate this plane.
Select it and press Shift + D, then rotate it 90 degrees on the Z axis. You can repeat this step if you want a more detailed patch of grass, and you can even use different masks for each plane.


Now you should subdivide your object, so that it doesn't stay flat and you can change its shape a bit.
Select all, press W and subdivide. After this, you can make adjustments to the UV by moving its vertices (G key).
It's important to note that while Blender uses one-sided faces by default, in the Unreal Engine 3 it's easy to set it to two-sided faces.
You need to add at least one material to the object. You need more if you used more than one masks. In that case, you have to assign a different material to every plane that has a different mask.

The current size of the grass would be tiny in the UDK, so let's make it about 20 times as big. Select all and press S, then type 20. Afterwards you want to adjust the placing because it most likely isn't in the right place.

Now we need to name the object. In 3D view, on the right sidebar, open Item and type in the name (replacing the default name "Plane").
 The only thing left to do in Blender is exporting. Exit edit mode (Tab), then select File>Export, and Autodesk FBX. In the left sidebar, check the "Selected Objects" box, and make sure that only the "Mesh" button is selected underneath. Name the file and export it to the desired location. 

Start the UDK. After closing the Welcome window, look at the Content Browser. In the lower left corner of it, click import. Find your exported FBX file, the mask(s), and the diffuse texture (if you made one), and open them.


If you already have a package, use that, if you don't, create one now and import your files. Grouping is also useful. The UDK is able to import the used textures from the FBX file, but I recommend you import them seperately, because depending on your version, it can cause errors.
The UDK may warn you that the FBX version is outdated, but this doesn't matter with static meshes. After the importing, find your files in the Content Browser, right click on the mask texture, and click "Create New Material". Name it, and after creating, open it.

In the Material Editor, you can see your mask in a box, and you can move the box around by holding CTRL and dragging it. Let's put it beside the Opacity Mask node, and connect the mask's black colored node to the Opacity Mask's node. In the properties section under Material, set Blend Mode from Opaque to Masked, then the Lighting Model to NonDirectional, then check the box below that says "Two Side". We only need a diffuse texture now. Put your own, or your selected one over the mask, and connect its black colored node into the Diffuse node. Save (the green check on the upper left) and close the window.

Let's open our static mesh, in the right sidebar open LODInfo, and look for 0. Elements 0. Material. Switch to the content browser and select the material we just made. Back in the StaticMesh Editor, click the green arrow next to the Material to assign it to the mesh.
If you've done all these steps correctly, the mesh is now complete and usable, you can rotate it with the right mouse button and zoom in and out with the left mouse button.


As the last step, let's drag and drop the static mesh from the Content Browser into the level. Pressing the space bar, you can manipulate the mesh. In the level you can move with WASD and the left and right mouse button.

Of course this is a really basic object. The grass used in our game, for example, is also influenced by the wind. This works based on the material. In the Unreal Engine 3 there are tons of possibilities, and in later posts I'd like to share some of the ones I discovered and learned.

I'm happy to answer any questions in the comment section. I'm also open for any requests you might have.

Have a nice day!

Pictures of our progress

Hi,

Since we haven't written too much about our game's world in the previous posts, we'll now share some pics. 


Everything shown on the pics is still under development, and not final.
(In the meantime, we're working on a tutorial. We hope to post that too, as soon as possible.)

2013/10/31

Happy Halloween!


Happy Halloween from the O.L. Team!

About Fox - Part 1

First of all, I'd like to introduce myself. I'm Geril and I'm mainly working on the graphical design of the game. In this post I'm going to write about our protagonist, mostly from the technological side.


Fox was created out of boredom on a piece of paper, and at first he had a more cartoony look.


 After that, I made other drawings to help me create Fox in 3D, these usually focused on his face.


At first, he was supposed to be a background character, so I made him with the lowest possible polygon count and the smallest possible texture size. I only gave him sunglasses so that his eye movement could be kept to a minimum.


When he became the main character, I tried to give him a more distinctive look; I made a scar on his right eye and eyebrow. As we were putting the game's story together (I will talk about the story in a later post), his right eye got replaced by a mechanical eye, and his face got an older, more mature and tired look.

Fox's clothes were a Max Payne-like leather jacket and a pair of jeans, but later, to make him more fit for the game's world, his clothes became cowboy-ish, with a poncho. The poncho was later replaced by some shoulder-protecting equipment due to the technical problems with the poncho (too many bones and unnecessary cloth physics).


Some say that Blender and the UDK are incompatible, but personally I think it's just more difficult to export certain kinds of meshes from Blender. For example, most of the problems happen while exporting the animation. That is why Fox's armature contains the least unconnected bones as possible. His movements resemble a human's more than an animal's, but of course his posture is influenced by his animal-like skeleton and body.

Fox has two different models, the first one shows when the player is controlling him and the second one is for cinematics. The cinematic model uses morph targets (or shape keys, as Blender calls them) for facial animation, while the other one only uses bones. These morph targets make it possible for me to make believable facial expressions for lip-syncing.


Morph targets in Blender (upper) and the UDK (lower)

The model is far from complete, it still needs lots of adjustments in every area. The biggest issue right now is the hair, but I hope we can fix that soon. I also plan on making him look like he has more fur.

In later posts I'll make a few tutorials on importing a skeletal mesh from Blender to the UDK. If you have any questions, I'll be more than happy to help in the comment section.

Have a nice day!

2013/10/28

Basic workflow: simple static object

In this post I'd like to show you our basic workflow.

Our primarily used software are Gimp, Blender and the UDK.
Gimp is a freely distributed image manipulation software that we use for making textures and drawing concept art. Blender is also free, it's an open-source 3D modeling software.
I'll show you how a simple object is made from scratch, all the way till it's usable in the engine.

In this case, we wanted to make a crate. We made the mesh in Blender first (although in some cases, it is recommended to make the textures first). We only use the necessary amount of polygons, because it's not an important object.


We then exported the UVs (the texture maps), and made the textures based on the UVs (though they are only placeholders right now). We used 3 kinds of textures in this case: a diffuse texture, a specular map, and a normal map.
I'll briefly explain what they do:
  • The diffuse texture is everything you see without any "special effects", essentially a drawing that the model is wrapped in.
  • The specular map determines what happens when the model receives light.
  • The normal map makes the model look more detailed, for example, the wood grains on this crate are normal mapped, so they don't look like they are simply drawn on.
The texture resolution is 1024*1024p, and we try to use one texture for as many models as possible.


To import the model into the UDK, we usually export from Blender in FBX format. After the importing was done, we needed to make a material, using our previously made textures.


So then we had our crate model in the engine as a static mesh, placable on any map. We created LODs for the crate (so that it gets simpler the farther away it is from the player), and a collision box.


And that's how it looks in our test map.
The cel-shade effect is not made by the material, it is only a post-process effect that is placed on every object.


So this is how we make simple models in a nutshell. We also plan on making modeling and UDK tutorials sometime soon.

See you next time!