Hello!
Here's a video for you:
Just a quick update on how we're doing. As you can see, we're experimenting with different controls: a fixed, side-scrolling camera with 3D movement. It works out pretty well. The only awkward thing about it is how sometimes you can't determine where you are in the 3rd dimension. We're planning to fix this with a small circle of shadow below the player, and a more dynamic camera.
P.S.: Subwoofer required for full experience
Showing posts with label environment. Show all posts
Showing posts with label environment. Show all posts
2015/01/24
2014/11/30
Story time!
Hi! We're going to share some information about the game's world. It's going to be a bit technical so bear with us. The next story post will be focused on the actual story and the characters.
So... here we go.
The story takes place on Koronite, a world made up of irons. Along with this iron based world there are other kinds of matters on the surface which make life possible. Water is rare to find, clean water even more so as the seas contain lots of iron mixed in with mercury.
So... here we go.
The story takes place on Koronite, a world made up of irons. Along with this iron based world there are other kinds of matters on the surface which make life possible. Water is rare to find, clean water even more so as the seas contain lots of iron mixed in with mercury.
Magnetism is what makes the continents, mountains, air and water move. The planet has such a high voltage that it could shatter on its own, but the energy is contained by resistors (gigantic natural poles).

The reason why life is possible in this world is because of the plants as many of them are able to extract iron from the air as well as other sources and incorporate them. They then give off the materials they don’t need - the ones that are needed for humans to live.

The life forms here are either based on iron or have evolved to survive in this environment. The people living on Koronite essentially adapted to the planet, their bodies able to process some of the iron. As such, they are heavier and sturdier but they regenerate less and more slowly. Their fur is strong but prone to rust if it’s not taken care of regularly. Breaking one of their bones may take tonnes of force but once broken, it stays that way. They can also have parasite-like irons consuming their bodies, or living with them in symbiosis.
The planet tries to get rid of outsiders on a daily basis, these are the more recent inhabitants who haven't evolved to process iron, yet they are determined in surviving at any cost.
The surface is varied. In some places the ground is hot and sandy, elsewhere it is cold with crumbled metal. There are endless oceans that look like large mirrors and also seemingly never-ending are the chasms, floating mountains made of dust and slowly moving damp cubes of metal.

While life is everywhere in its own stubborn form, the inhabitants are fighting an endless war against nature using steam and sparks. After centuries they can finally say the surface is theirs. The problem is, the surface is not the only layer the world has.
Before conquering the surface life only existed deep below it. The creatures were primitive and less able to adapt to changes. Their large bodies remained as caves between the layers of the planet. As it moved and changed, the surface became more stable than the other layers. Water carved long caverns that became the home of simple and more complex creatures alike. So while the surface keeps changing, under it, chaos is the only natural order.
The average inhabitant stays far away from the deeper levels - they have enough trouble on the surface already - yet there are people who use the caves to remain hidden, to do things under everyone’s feet. They have to fight other creatures or nature itself for these places, so it isn’t very common.
The average inhabitant stays far away from the deeper levels - they have enough trouble on the surface already - yet there are people who use the caves to remain hidden, to do things under everyone’s feet. They have to fight other creatures or nature itself for these places, so it isn’t very common.

About one and a half centuries ago, it became forbidden in most regions to work, develop and transport under the surface. Only mining could be continued and even that was kept under close supervision. Recently there have been revolts across the world. Leaders came and went, laws faded and became rewritten. Nations changed names and conquered new lands.

In this unstable world, to survive, beggars can't be choosers.
Our protagonists’ lives start out from the village in the valley of Maron.
They separate for a while after but their past and goals ultimately causes their paths to collide soon enough.
They separate for a while after but their past and goals ultimately causes their paths to collide soon enough.

names not final
2014/04/23
Maps and control
Hi!
We're constantly working on the game's controls, and also on a map so that we can test the controls. We drew a sketch for a map structure, and we already made it functional in the UDK. So, here you go: enjoy the sight of the player character jumping around in a sketch, in a textbook, within a wonderful, low-FPS gif. If it loads.


We're constantly working on the game's controls, and also on a map so that we can test the controls. We drew a sketch for a map structure, and we already made it functional in the UDK. So, here you go: enjoy the sight of the player character jumping around in a sketch, in a textbook, within a wonderful, low-FPS gif. If it loads.
(Next time the quality's going to be better, I promise.)
Apart from the sketch, we made another simple map, without a real structure, to see how the environment would work with the control mechanics. The design is very basic. We only have a few world objects, that's why it doesn't have any detail and looks kind of boring. We'll be working on those later.
Here are some pictures of the map:
2013/11/14
Pictures of our progress 02
Hi, I'm Geril. I'll just post a few pictures again so you can see how the project's going. You can expect more of these posts regularly.


Since my English isn't very good, Lussy's translating and putting all the posts together.
Have a nice day!
2013/11/05
Tutorial: Making "cheap" grass, from Blender to UDK
Hi, I'm Geril, and in this tutorial I'm going to show you how to make a static environment object in a step by step tutorial using Blender and the UDK. In this case the object is a patch of grass.
First, we need a mask. A mask is a black and white image on which white means visible, and black means invisible. The image should have no grey, only black and white. The one I'm using is 512*512 pixels. (Unreal 3 only recognizes binary numbers for resolution. So: 64*64, 128*128, 256*256, 512*512, 1024*1024, 2048*2048)
Other than the mask, you also need a diffuse texture that shows on the surface of the grass. Right now I'm using one that isn't an actual grass texture, but of course it's better to create your own or select one from the UDK's files.
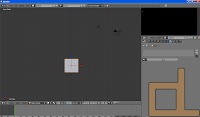 Open up Blender (v2.63 is what I'm using). In the 3d view the first thing you see is a cube that Blender loads on startup. We don't need this cube so you can delete it. The basic controls are: middle mouse button for rotating the view, and shift + middle mouse button for moving the camera.

 Press Tab to enter edit mode.

 The plane needs to be a little lower on the Z axis, so let's move it. Select all vertices, then press G to grab it. If you press Z after G, the plane will only move on the Z axis. Also, holding down CTRL whilst moving the plane will make it move according to the grid, and shift will slow the movement down. Make it so that the plane is a little under the X and Y axes, so it won't float over the ground.
 Unless the player has no chance to go near it or look at it from different angles, a single plane doesn't make our grass believable at all, so let's duplicate this plane.
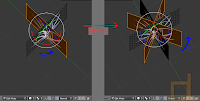
Select it and press Shift + D, then rotate it 90 degrees on the Z axis. You can repeat this step if you want a more detailed patch of grass, and you can even use different masks for each plane.

Now you should subdivide your object, so that it doesn't stay flat and you can change its shape a bit.
Select all, press W and subdivide. After this, you can make adjustments to the UV by moving its vertices (G key).
It's important to note that while Blender uses one-sided faces by default, in the Unreal Engine 3 it's easy to set it to two-sided faces.
 In the Material Editor, you can see your mask in a box, and you can move the box around by holding CTRL and dragging it. Let's put it beside the Opacity Mask node, and connect the mask's black colored node to the Opacity Mask's node. In the properties section under Material, set Blend Mode from Opaque to Masked, then the Lighting Model to NonDirectional, then check the box below that says "Two Side". We only need a diffuse texture now. Put your own, or your selected one over the mask, and connect its black colored node into the Diffuse node. Save (the green check on the upper left) and close the window.
 Let's open our static mesh, in the right sidebar open LODInfo, and look for 0. Elements 0. Material. Switch to the content browser and select the material we just made. Back in the StaticMesh Editor, click the green arrow next to the Material to assign it to the mesh.
If you've done all these steps correctly, the mesh is now complete and usable, you can rotate it with the right mouse button and zoom in and out with the left mouse button.
 As the last step, let's drag and drop the static mesh from the Content Browser into the level. Pressing the space bar, you can manipulate the mesh. In the level you can move with WASD and the left and right mouse button.
 Of course this is a really basic object. The grass used in our game, for example, is also influenced by the wind. This works based on the material. In the Unreal Engine 3 there are tons of possibilities, and in later posts I'd like to share some of the ones I discovered and learned.
I'm happy to answer any questions in the comment section. I'm also open for any requests you might have.
Have a nice day!
First, we need a mask. A mask is a black and white image on which white means visible, and black means invisible. The image should have no grey, only black and white. The one I'm using is 512*512 pixels. (Unreal 3 only recognizes binary numbers for resolution. So: 64*64, 128*128, 256*256, 512*512, 1024*1024, 2048*2048)
Other than the mask, you also need a diffuse texture that shows on the surface of the grass. Right now I'm using one that isn't an actual grass texture, but of course it's better to create your own or select one from the UDK's files.
 Open up Blender (v2.63 is what I'm using). In the 3d view the first thing you see is a cube that Blender loads on startup. We don't need this cube so you can delete it. The basic controls are: middle mouse button for rotating the view, and shift + middle mouse button for moving the camera.
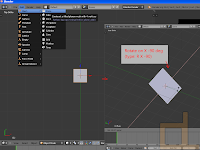
Load your texture in the UV/Image editor section. In the 3D view, add a simple plane: ADD/MESH/PLANE. From this point on, we're going to edit the plane in edit mode.
 Press Tab to enter edit mode.
Let's rotate the plane 90 degrees on the X axis.

To do this precisely, press R, X and then type 90, otherwise just use the 3D rotate manipulator.
After this is done, we'll unwrap the UV of the plane on the texture. Just select all the vertices (with shift you can multi-select), the press U and then Unwrap. Since the plane is really simple, its UV won't be too complicated.

 Unless the player has no chance to go near it or look at it from different angles, a single plane doesn't make our grass believable at all, so let's duplicate this plane.
Select it and press Shift + D, then rotate it 90 degrees on the Z axis. You can repeat this step if you want a more detailed patch of grass, and you can even use different masks for each plane.

Now you should subdivide your object, so that it doesn't stay flat and you can change its shape a bit.
Select all, press W and subdivide. After this, you can make adjustments to the UV by moving its vertices (G key).
It's important to note that while Blender uses one-sided faces by default, in the Unreal Engine 3 it's easy to set it to two-sided faces.
You need to add at least one material to the object. You need more if you used more than one masks. In that case, you have to assign a different material to every plane that has a different mask.
 The current size of the grass would be tiny in the UDK, so let's make it about 20 times as big. Select all and press S, then type 20. Afterwards you want to adjust the placing because it most likely isn't in the right place.
Now we need to name the object. In 3D view, on the right sidebar, open Item and type in the name (replacing the default name "Plane").
 The only thing left to do in Blender is exporting. Exit edit mode (Tab), then select File>Export, and Autodesk FBX. In the left sidebar, check the "Selected Objects" box, and make sure that only the "Mesh" button is selected underneath. Name the file and export it to the desired location.

Now we need to name the object. In 3D view, on the right sidebar, open Item and type in the name (replacing the default name "Plane").

Start the UDK. After closing the Welcome window, look at the Content Browser. In the lower left corner of it, click import. Find your exported FBX file, the mask(s), and the diffuse texture (if you made one), and open them.

If you already have a package, use that, if you don't, create one now and import your files. Grouping is also useful. The UDK is able to import the used textures from the FBX file, but I recommend you import them seperately, because depending on your version, it can cause errors.
The UDK may warn you that the FBX version is outdated, but this doesn't matter with static meshes. After the importing, find your files in the Content Browser, right click on the mask texture, and click "Create New Material". Name it, and after creating, open it.


If you've done all these steps correctly, the mesh is now complete and usable, you can rotate it with the right mouse button and zoom in and out with the left mouse button.


I'm happy to answer any questions in the comment section. I'm also open for any requests you might have.
Have a nice day!
Subscribe to:
Posts (Atom)