2016 has been a long and eventful year. We've started a new project (Lemniscate), it got greenlit on Steam, but in the meantime, we ran out of resources... We've learned a lot nonetheless. Even our latest fanart seems to have turned out good - it has been seen by about ten thousand people. Thanks, Yuumei, for sharing it!
Lemniscate is progressing slowly, because it requires more time and money than we currently have. Seems like we always take on bigger projects than we can handle... Anyways, since it's not in a bad shape and the foundations are laid down, as soon as we get enough resources, we'll start making a demo for it and promoting it again.
In the meantime, we're educating ourselves in game design and development with tiny (really tiny this time) side-projects. Our current side/practice project is a small two player co-op puzzle game that was inspired by the Nintendo Switch, basically. We really like local coop games and they are the minority nowadays, and we love Nintendo consoles in general. Hearing the news that Unreal 4 is going to be supported on the Switch, maybe if the project turns out to be anything good, we'll be able to release it. (That goes for all of our projects, by the way)
Thank you for helping us out with kind words, actions, or just by visiting this blog once in a while. It means a lot to know that we're not doing this in vain.
Happy New Year!
2016/12/31
2016/11/28
3D Yuumei Fanart: Frey Underground!
Hey!
We've had some free time this month, and decided to mix things up a bit. This is completely unrelated to any of our previous stuff - it's a fanart of Yuumei's Underground picture.
The whole thing started when we realized that our portfolio was a little... one-sided. Not everyone likes the OLP stuff and style, but until now, that was the only thing we could showcase as a team. Separately we've worked in many different styles, but together we've mostly worked in one. So we've decided to try out different styles and subjects for practice, experimentation, and for our portfolio. This was also a challenge for us, to see how far we can get in about a week and how efficient we are. We've probably went a little overboard, but oh well.
Frey, the character is fully rigged and has a morph target set for emotions and complete lip-syncing. Basically we've created a game-ready character as fast as we could.
We've planned to include a violin playing and a random goofy animation as well, but exporting into Sketchfab-friendly FBX made our work hard. The process was very tedious and took up almost a whole additional day. (We're now convinced that Blender hates us) We can't include those animations in the same scene we've uploaded, and we thought making a new scene just for that would be overkill. Maybe we'll upload it someday, if people are interested.
We've decided on this particular piece because I [Lussy] am a long time fan of Yuumei and thought that shiny PBR lights would go well with her art style. It was refreshing to work based on someone else's "concept art". Can't wait for Fisheye Placebo to continue!
Here are some WIP pics:

We hope you liked it! We were trying hard not to butcher the scene. Hope we didn't.
We've had some free time this month, and decided to mix things up a bit. This is completely unrelated to any of our previous stuff - it's a fanart of Yuumei's Underground picture.
The whole thing started when we realized that our portfolio was a little... one-sided. Not everyone likes the OLP stuff and style, but until now, that was the only thing we could showcase as a team. Separately we've worked in many different styles, but together we've mostly worked in one. So we've decided to try out different styles and subjects for practice, experimentation, and for our portfolio. This was also a challenge for us, to see how far we can get in about a week and how efficient we are. We've probably went a little overboard, but oh well.
Frey, the character is fully rigged and has a morph target set for emotions and complete lip-syncing. Basically we've created a game-ready character as fast as we could.
We've planned to include a violin playing and a random goofy animation as well, but exporting into Sketchfab-friendly FBX made our work hard. The process was very tedious and took up almost a whole additional day. (We're now convinced that Blender hates us) We can't include those animations in the same scene we've uploaded, and we thought making a new scene just for that would be overkill. Maybe we'll upload it someday, if people are interested.
We've decided on this particular piece because I [Lussy] am a long time fan of Yuumei and thought that shiny PBR lights would go well with her art style. It was refreshing to work based on someone else's "concept art". Can't wait for Fisheye Placebo to continue!
Here are some WIP pics:
 |
| Frey isn't happy with his incomplete hair |
 |
| Attack of the placeholder normalmaps |
 |
| Frey's violin in Sketchfab's editor |

Some of Frey's test expressions and lip-sync
We love Sketchfab, and it's a shame that it isn't more popular. Whenever we show Sketchfab links or embeds to someone, we have to explain that it isn't a picture or a video, and that the camera can be moved. We always have to either explain the exact controls and settings (for example, this model always loads in SD quality and you have to manually set it to HD) in a wall of text, or leave out the instructions and hope very strongly that people will try clicking on the model. We went with the latter this time.We hope you liked it! We were trying hard not to butcher the scene. Hope we didn't.
2016/10/30
Lemniscate's gameplay structure!
It's about time we wrote a post about Lemniscate again.
Looking back, we wrote surprisingly little about the game's... "game" aspect. Yes, we are afraid of potentially spoiling the game, but we realized we can't expect anyone to look forward to a game they know very little about. So, here goes.
One integral part of Lemniscate is using items. For example: the player needs a crowbar to get into the air vents, and a screwdriver to open a fuse box.

Another usable item will be related to surveillance cameras. There are several surveillance cameras on the ship in every room. From the story's viewpoint, this is because the transport company that owns the ship requires the overseer of the ship to keep the ship's crew under constant surveillance. The overseer has a portable device for this purpose - a gadget that is connected to every camera on the ship. In-game, this is a very valuable item for the player, because it lets him look into any room he wants, anywhere he is. He can time his actions according to what happens in different parts of the ship. Obviously this item will be hard to get, and its location will vary depending on how things went during previous days.

In addition to these, we're working on various events for Lemniscate. These events will happen when certain actions are executed by the player - for example, if he changes the destination's coordinates on the ship, it will go off course and steer into meteoroids that destroy a part of it. If the player survives, he'll hear the sirens and see the alerts on every screen while the whole ship freezes and he slowly dies.

Because of this structure of gameplay, we're not basing advancement on experience points, like in RPGs. Lemniscate will be like an adventure, there will be no good or bad answers to a question, only different roads to an ending. Destroying the ship may mean revealing crucial information about the story or characters - it's not "game over".
The disadvantage is that once the player finishes the game, replaying it won't be as much of a challenge. Because of this, we're planning to include multiple endings depending on playtime and choices.
We are trying to create a story with believable characters that is one of a kind. The player will decide if he wants to listen to the story, find out more, or just play the game and ignore the hidden details. (Lemniscate's universe is the same as OLP's!)
The ship's crew will drive the story forward - not through dialogue or encounters but through the recorded notes in their PADs (Personal Assistant Device). They all had their PADs with them when the time anomaly began, so the entries will change along with the player's actions.

We're writing a lot of text, developing the visuals and thinking about the story in-depth for Lemniscate to be relatable and atmospheric. We have a lot of assets to create before we achieve the look we're aiming for - a home for a whole crew of people that have been living there for more than a decade. We hope we hit the mark and players will find the experience enjoyable.
Looking back, we wrote surprisingly little about the game's... "game" aspect. Yes, we are afraid of potentially spoiling the game, but we realized we can't expect anyone to look forward to a game they know very little about. So, here goes.
One integral part of Lemniscate is using items. For example: the player needs a crowbar to get into the air vents, and a screwdriver to open a fuse box.


In addition to these, we're working on various events for Lemniscate. These events will happen when certain actions are executed by the player - for example, if he changes the destination's coordinates on the ship, it will go off course and steer into meteoroids that destroy a part of it. If the player survives, he'll hear the sirens and see the alerts on every screen while the whole ship freezes and he slowly dies.

Because of this structure of gameplay, we're not basing advancement on experience points, like in RPGs. Lemniscate will be like an adventure, there will be no good or bad answers to a question, only different roads to an ending. Destroying the ship may mean revealing crucial information about the story or characters - it's not "game over".
The disadvantage is that once the player finishes the game, replaying it won't be as much of a challenge. Because of this, we're planning to include multiple endings depending on playtime and choices.
We are trying to create a story with believable characters that is one of a kind. The player will decide if he wants to listen to the story, find out more, or just play the game and ignore the hidden details. (Lemniscate's universe is the same as OLP's!)
The ship's crew will drive the story forward - not through dialogue or encounters but through the recorded notes in their PADs (Personal Assistant Device). They all had their PADs with them when the time anomaly began, so the entries will change along with the player's actions.

2016/09/30
Underrated games!
Hi!
We're deep in work. We're working on Lemniscate, sometimes OLP, and lots of other paid projects. While we can't update you with anything we're working on as of yet, we've had an idea. We usually only post work-related things on our blog, so today we'll look more on the fun side of things.
Both of us got into game development because we've spent our childhood and adulthood playing video games. We'll share some of our favorite games that are not widely known, or underrated.
Donkey Kong Country: Tropical Freeze

Dust: An Elysian Tail

This game has a similar gameplay to Castlevania and Metroid. It was mostly made by one person, Dean Dodrill.
It's so underappreciated that even I had no time to finish it. It has lots of references to Korean food and culture, and funnily, the last time I've played it was when I was on a 3-hour train ride across South Korea last year. If I'll ever have more free time... I'll finish it.
 Anyone who's played a Mario Kart game knows why the series is loved by many. It's the perfect party game, ruining many friendships with some rather unfair moves.
We're deep in work. We're working on Lemniscate, sometimes OLP, and lots of other paid projects. While we can't update you with anything we're working on as of yet, we've had an idea. We usually only post work-related things on our blog, so today we'll look more on the fun side of things.
Both of us got into game development because we've spent our childhood and adulthood playing video games. We'll share some of our favorite games that are not widely known, or underrated.
Donkey Kong Country: Tropical Freeze

I honestly don't understand how this game could go so far under the radar. In my opinion, this is one of the tightest and best platformers of this console generation. All the levels are varied and excellently designed, both gameplay-wise and graphically. What's more, almost all of them have their own music written by David Wise, resulting in a 4-hour OST that we listen to often while working on our games. I want to make OLP's controls feel as responsive as DKC: TF's do - when we were getting started with the controls, I would often turn on this game to get the jump height and speed right.
So if you've got a few hours to spare, DKC:TF will pull you right in with its cheerful atmosphere and catchy songs, and you'll soon be smiling smiles of pure joy.
Dust: An Elysian Tail

This game has a similar gameplay to Castlevania and Metroid. It was mostly made by one person, Dean Dodrill.
It's so underappreciated that even I had no time to finish it. It has lots of references to Korean food and culture, and funnily, the last time I've played it was when I was on a 3-hour train ride across South Korea last year. If I'll ever have more free time... I'll finish it.
Mario Kart: Double Dash

Usually the most recent game is considered the best, and with good reason, but Double Dash was different from all the other entries in the series, and it is most often considered a misstep.
The main difference is the option to play co-op with two players sitting in one kart, one driving, the other using items. This is an aspect of the game that we'd like to implement in some of our games.


 It's easiest to describe this game as the predecessor of the Bioshock games, but it had lots more possibilities. The graphics and the interface do not stand up to today's standards, and the story is also slow. We recommend playing the Steam version with someone else in co-op. It's recommended to play with someone who has at least as much patience as you do for these kind of games.
Enslaved: Odyssey to the West

Although the gameplay itself wasn't really satisfying (jumping from hotspot to hotspot, slaughtering enemies with a simple fight system), the story, the characters and the graphics are amazing even today. We want to include similarly fleshed out and believable characters in our own games. Although we probably won't be able to hire Andy Serkis to do the mocap and voice acting for us. Sigh..

Brütal Legend
We first came to like Tim Schafer's game through Grim Fandango, but he's risen to the rank of Legend for us with Psychonauts. Brütal Legend basically looks like every heavy metal fan's wet dream. The atmosphere is great, the characters are well designed and flexible. It seems like Tim Schafer mostly begins his games with simple ideas, then develops that simple idea until it gets really complex.
And that humor.
System Shock 2
 It's easiest to describe this game as the predecessor of the Bioshock games, but it had lots more possibilities. The graphics and the interface do not stand up to today's standards, and the story is also slow. We recommend playing the Steam version with someone else in co-op. It's recommended to play with someone who has at least as much patience as you do for these kind of games.
This game has inspired us while building the abandoned spaceship of Lemniscate, and helped us pass some hours with its LAN multiplayer gamemode.
Please look forward to our updates next month!
Please look forward to our updates next month!
2016/08/26
Inbetween!
We are in-between jobs for now, so we've finally had a little time to spend on developing Lemniscate.
 One of the biggest problems we're facing (especially me, Geril, as I'm a graphic artist) is the dark, grey-scale aesthetic of the game. If you've seen posts from us from before we've announced Lemniscate, you might have noticed that we like vivid colors and flexible characters. We can't really do that in Lemniscate, it'd go against the game's theme. The graphics are so literally grey that I only use a single texture file for BaseColor, AO, Roughness and Metallic (on different channels).
The other problem we've run into is with the adventure aspect. As with point-and-click games, things that are obvious for the developers aren't necessary so plain to see for the players. We might think that it's logical to wash off the stench of waste water by standing in the shower while the water is running, but this might feel illogical in a video game environment where you open air vents with crowbars.
We are trying to solve both of these problems with the Inbetween. The Inbetween is, as the name describes, a dimension in between dimensions. Here, the player can find clues on how to progress in the game. In this dimension, we're also letting all our closeted frustration with the dark spaceship out: lots of weird shapes, unnecessary colors, tons of particle effects.
We're trying to make the place seem otherworldly. The player character sees these forms and colors because his brain can't decode what he's seeing. He's only able to move inside a bubble there, a bubble that is unaffected by time.

The clues are going to be cryptic and visual, without any text. For example, if you have to blow a fuse to get to the content of a closet, you're going to see a red poof in the distance, and a red shape a bit farther, that represents the contents of the closet. When you walk closer, you'll begin to see the surroundings of the closet. The important objects are going to appear in vivid colors, while the others are going to be darker, and only there to help the player recognize the part of the ship.
So, yeah, the cryptic game gets another cryptic layer. But at least this one's colorful.

We'll continue to work on the game and will post more updates in the coming weeks.
 One of the biggest problems we're facing (especially me, Geril, as I'm a graphic artist) is the dark, grey-scale aesthetic of the game. If you've seen posts from us from before we've announced Lemniscate, you might have noticed that we like vivid colors and flexible characters. We can't really do that in Lemniscate, it'd go against the game's theme. The graphics are so literally grey that I only use a single texture file for BaseColor, AO, Roughness and Metallic (on different channels).
The other problem we've run into is with the adventure aspect. As with point-and-click games, things that are obvious for the developers aren't necessary so plain to see for the players. We might think that it's logical to wash off the stench of waste water by standing in the shower while the water is running, but this might feel illogical in a video game environment where you open air vents with crowbars.
We are trying to solve both of these problems with the Inbetween. The Inbetween is, as the name describes, a dimension in between dimensions. Here, the player can find clues on how to progress in the game. In this dimension, we're also letting all our closeted frustration with the dark spaceship out: lots of weird shapes, unnecessary colors, tons of particle effects.
We're trying to make the place seem otherworldly. The player character sees these forms and colors because his brain can't decode what he's seeing. He's only able to move inside a bubble there, a bubble that is unaffected by time.

So, yeah, the cryptic game gets another cryptic layer. But at least this one's colorful.

You can get to the Inbetween in the final minutes before time resets. The 'reset' itself is a wave that goes through the ship, but a few minutes before that happens, there is a smaller wave coming to warn the player of the approaching reset. After the small wave, rifts appear in the dimension in certain parts of the ship. These rifts can only be seen from up close. From afar, you only see barely visible blue sparks. The locations of the portals are worth memorizing, they won't always be at the same place, but they don't appear at random, either.
We'll continue to work on the game and will post more updates in the coming weeks.
2016/07/31
Tutorial: Dynamically changing facial normal maps in Unreal Engine 4
Hi!
We've promised more tutorials, and we've specifically promised a tutorial on dynamic facial normal maps in UE4. So here it is! Before we begin...
It took a long time to get started with these, because we were busy with other works, our own projects, and with learning a LOT about the engine. So for now, we didn't really progress with the actual project of Lemniscate, but this recently acquired knowledge will speed us up when we do have time to progress.
Now, on to the tutorial.
***
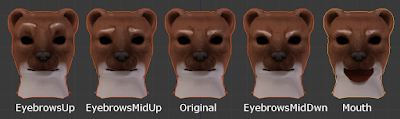
To start out, you must have a finished face model with bone-driven morph targets. You'll have to decide which morphs should activate normal map changes. For example, Sal here has normal maps for raising each individual eyebrow, for frowning, for raising the inner portion of his eyebrows, and for opening his mouth. For a human, there could be additional wrinkles on the nose, under the eyes and such. Because Sal has fur, these normal maps are pretty subtle.
We will probably use a different technology for him, since we use NeoFur now for the fur effect, so this is only for demonstration.
We are using Blender and GIMP in this tutorial, but you can use any modeling and photo editing software you like. But Blender and GIMP are free, so no excuses!

First, you'll have to remove every part of the skeletal mesh that is irrelevant. The only parts to stay should be the parts with the material that will make use of the dynamic normal map (so, in this case, the face).

Duplicate the head. Make one for every morph target you want to influence the normals, and then apply the chosen morphs to the heads, one morph to one mesh.
Duplicate all of the heads again, make a new version that removes absolutely everything other than the parts where you want the normals to change (so the neck, back of the head, ears have to go). Then apply a multires modifier and set it to about x4, so that you can make details on the face with the sculpt tool.

Don't worry about anything else other than the wrinkles, because this normal map will be added to the default normal, so all the base normal map details will still be visible. It's better if you don't make overlapping wrinkles, because all of these will be combined into a single normal map later.

After you're done with sculpting, bake normal maps from each of the sculpted faces onto the original meshes (you can find our tutorial on normal map baking with Blender here, the only thing different here is using multires). Optionally you can also bake ambient occlusion maps for more illusion of depth, which we didn't, but you can operate them the same way as the normals.

After you're done baking all of them, combine them into a single file (this is the part where you can make adjustments if you have overlapping wrinkles!)

Next, you'll have to make masks for using this additional normal map. It's best if you use the image file's channels for separating different masks. Because a mask only uses greyscale values, you can combine up to 4 of them into a single image file using the red, green, blue and alpha channels. The ideal format to use for this is the Targa format (.tga), because it keeps the channels clean and separate. You can use GIMP or Photoshop to edit the channels individually, but you can probably use any other photo-manipulation software for this as well.

I've created six different wrinkles, so I will save them as two .tga files using the r, g, b channels. Use a black background. When editing the channels, you'll have to use white to fill the spaces where the individual wrinkled spots are.

These will indicate the areas where you want to add your new wrinkle normal map to the default one. After finishing, combine the channels into colored .tga files and save.

It's time to open up Unreal 4.

Import the new normal map and the masks, and put them inside the character's material. Arrange the mask textures below each other and add a multiply node next to each of their channels. Connect scalar parameters to the other input of the multiply nodes and name them appropriately - for example, the parameter next to the mask controlling the wrinkles above the left eyebrow will be called BrowUp_L. Name all of them, and make sure not to change their default values from 0.
Create LinearInterpolation nodes (Lerp nodes) for all of the masks, and chain them together using their A inputs. Create a three value texture sample node (hold down 3 and click with the left mouse button) and set the third value (blue) to 1 (so, 0,0,1) or just use an empty normal map. Connect this into the first Lerp node's A input.
Connect the multiply nodes to the Lerp nodes' alpha inputs, and our new normal map into the Lerp nodes' B inputs. The last Lerp node's output should go into a BlendAngleCorrectedNormals node's AdditionalNormal input, and the original normal map should be connected to the BaseNormal input. Connect the last output to the final material input node's Normal input.
You are done with the material editor, let's get started with preparing the skeleton!
These are bone driven morph targets. Currently there isn't a node for getting the value of a morph target in Blueprints (the 'get morph target' node doesn't return any other value other than 0, correct me if I'm wrong about this). So what we have to do is create sockets for each bone that drives a morph target that we want to add dynamic normal maps to. Then you should rotate the morph targets to such a position that you can easily remember and calculate with - you should choose a rotation axis (in my case, X) that matches with the rotation of the bone that drives the morph.
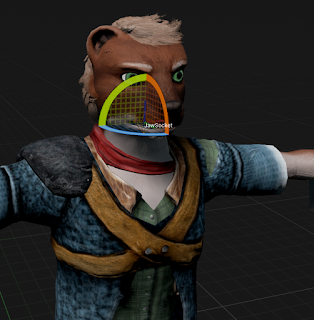
So, in an ideal case, when the morph target's value is 1, the bone's local X rotation is 90 degrees, and the socket's should read the same. When the value is -1, the rotation should read -90 degrees. This is important, because if the degrees are, for example, 90 for neutral, 0 for -1 and 180 for 1, then the 180 degrees will cause problems. In Unreal, if the degree would go above 180, it becomes -180, which is a nightmare when working with clamps. So, ideally just stick to -90, 0 and 90 degrees.
You can see the socket's local rotations in the Skeleton view if you select them while an animation is playing. You can also output them in a print node and check while playing, or right click on them in a blueprint, 'watch' them and the values will appear on the blueprint while the game is playing.
Let's move on to the animation blueprint that drives all of this!
You may get all of it by just looking at the picture, but I'll explain everything below.
You need to add this to the character's anim blueprint's event graph's Update Animation event. I've added a bool that can turn off the whole thing if it's not needed. Then, the blueprint makes sure that the variable holding the material of the face isn't empty; if it is, the blueprint will create a dynamic material out of the appropriate material and use that. (The dynamic part is important, parameters can only be updated in dynamic materials, and so far I've only managed to create them during runtime. So this part will happen when the anim blueprint starts updating.)
Then comes the math. I'll show you the easiest example: you want to figure out when to activate the normal map for wrinkling the forehead above the left brow. You'll have to get the appropriate morph target's socket's rotation first (make sure that you get the rotation in component space - the rotation compared to the original rotations of the socket, not in world space, because that rotation is compared to the world's rotation. You can get component space by using the Socket Transform node instead of the simple rotation node). In our case, when the morph target's value is 1, the socket's rotation is 90.
The material parameter's values are: 0 for invisible, 1 for completely visible, everything in between is partly visible, visibility depending on the number. For this reason, we have to assign 90 degrees to the number 1, and 0 degrees to the number 0. The easiest way to do this is using the 'normalize to range' node. This node lets you type in a minimum and maximum value, and outputs the position of the input number on this scale as a number from 0 to 1 (for example, on a range of 0 to 100, 87 would be 0,87).
After we got this number, we just have to set it as the scalar material parameter controlling the normal map's opacity, and we're done. It's a good idea to clamp the values of the socket rotations, because animations - obviously - are not clamped to a 90 degrees of movement, there can be slip-ups. (This is where the jump from 180 to -180 would make things hard: -180 is well below 0 or even -90, so it would instantly make the value go from 1 to 0, thus make the normalmap invisible, which is something that we don't want.)
A slightly more complicated version is if both the positive and negative morph target values are bound to normal maps. You'll have to do the first part the same way, but you have to get the absolute value of the rotation degrees of the socket (negative numbers become positive, positive numbers stay positive), and then normalize to range. The rest is the same.
The only other variation we're using is multiple morph targets triggering the same normal map. If you want some of the morphs to affect the normal map's opacity a little less then others, you'll have to multiply the output amount by some less-than-1 number, like 0.8. At the end, you'll have to add all the affecting morph's values together, then clamp the resulting number between 0 and 1. That's all there is to it, really.
For testing, I suggest you create a morph target test animation where you operate all of the morphs individually and in order. You'll be able to clearly see if all of the morphs are working. For me, there was a lot of trial and error involved, but you could minimize this by clearly noting and setting all the socket's rotations.
We've promised more tutorials, and we've specifically promised a tutorial on dynamic facial normal maps in UE4. So here it is! Before we begin...
It took a long time to get started with these, because we were busy with other works, our own projects, and with learning a LOT about the engine. So for now, we didn't really progress with the actual project of Lemniscate, but this recently acquired knowledge will speed us up when we do have time to progress.
Now, on to the tutorial.
***
To start out, you must have a finished face model with bone-driven morph targets. You'll have to decide which morphs should activate normal map changes. For example, Sal here has normal maps for raising each individual eyebrow, for frowning, for raising the inner portion of his eyebrows, and for opening his mouth. For a human, there could be additional wrinkles on the nose, under the eyes and such. Because Sal has fur, these normal maps are pretty subtle.
We will probably use a different technology for him, since we use NeoFur now for the fur effect, so this is only for demonstration.
We are using Blender and GIMP in this tutorial, but you can use any modeling and photo editing software you like. But Blender and GIMP are free, so no excuses!


Duplicate the head. Make one for every morph target you want to influence the normals, and then apply the chosen morphs to the heads, one morph to one mesh.


Don't worry about anything else other than the wrinkles, because this normal map will be added to the default normal, so all the base normal map details will still be visible. It's better if you don't make overlapping wrinkles, because all of these will be combined into a single normal map later.


After you're done baking all of them, combine them into a single file (this is the part where you can make adjustments if you have overlapping wrinkles!)


I've created six different wrinkles, so I will save them as two .tga files using the r, g, b channels. Use a black background. When editing the channels, you'll have to use white to fill the spaces where the individual wrinkled spots are.


It's time to open up Unreal 4.

Import the new normal map and the masks, and put them inside the character's material. Arrange the mask textures below each other and add a multiply node next to each of their channels. Connect scalar parameters to the other input of the multiply nodes and name them appropriately - for example, the parameter next to the mask controlling the wrinkles above the left eyebrow will be called BrowUp_L. Name all of them, and make sure not to change their default values from 0.
Create LinearInterpolation nodes (Lerp nodes) for all of the masks, and chain them together using their A inputs. Create a three value texture sample node (hold down 3 and click with the left mouse button) and set the third value (blue) to 1 (so, 0,0,1) or just use an empty normal map. Connect this into the first Lerp node's A input.
Connect the multiply nodes to the Lerp nodes' alpha inputs, and our new normal map into the Lerp nodes' B inputs. The last Lerp node's output should go into a BlendAngleCorrectedNormals node's AdditionalNormal input, and the original normal map should be connected to the BaseNormal input. Connect the last output to the final material input node's Normal input.
You are done with the material editor, let's get started with preparing the skeleton!
These are bone driven morph targets. Currently there isn't a node for getting the value of a morph target in Blueprints (the 'get morph target' node doesn't return any other value other than 0, correct me if I'm wrong about this). So what we have to do is create sockets for each bone that drives a morph target that we want to add dynamic normal maps to. Then you should rotate the morph targets to such a position that you can easily remember and calculate with - you should choose a rotation axis (in my case, X) that matches with the rotation of the bone that drives the morph.

You can see the socket's local rotations in the Skeleton view if you select them while an animation is playing. You can also output them in a print node and check while playing, or right click on them in a blueprint, 'watch' them and the values will appear on the blueprint while the game is playing.
Let's move on to the animation blueprint that drives all of this!
 |
| It's pretty big, so you may have to download it to see it properly |
You may get all of it by just looking at the picture, but I'll explain everything below.
You need to add this to the character's anim blueprint's event graph's Update Animation event. I've added a bool that can turn off the whole thing if it's not needed. Then, the blueprint makes sure that the variable holding the material of the face isn't empty; if it is, the blueprint will create a dynamic material out of the appropriate material and use that. (The dynamic part is important, parameters can only be updated in dynamic materials, and so far I've only managed to create them during runtime. So this part will happen when the anim blueprint starts updating.)
Then comes the math. I'll show you the easiest example: you want to figure out when to activate the normal map for wrinkling the forehead above the left brow. You'll have to get the appropriate morph target's socket's rotation first (make sure that you get the rotation in component space - the rotation compared to the original rotations of the socket, not in world space, because that rotation is compared to the world's rotation. You can get component space by using the Socket Transform node instead of the simple rotation node). In our case, when the morph target's value is 1, the socket's rotation is 90.
The material parameter's values are: 0 for invisible, 1 for completely visible, everything in between is partly visible, visibility depending on the number. For this reason, we have to assign 90 degrees to the number 1, and 0 degrees to the number 0. The easiest way to do this is using the 'normalize to range' node. This node lets you type in a minimum and maximum value, and outputs the position of the input number on this scale as a number from 0 to 1 (for example, on a range of 0 to 100, 87 would be 0,87).
After we got this number, we just have to set it as the scalar material parameter controlling the normal map's opacity, and we're done. It's a good idea to clamp the values of the socket rotations, because animations - obviously - are not clamped to a 90 degrees of movement, there can be slip-ups. (This is where the jump from 180 to -180 would make things hard: -180 is well below 0 or even -90, so it would instantly make the value go from 1 to 0, thus make the normalmap invisible, which is something that we don't want.)
A slightly more complicated version is if both the positive and negative morph target values are bound to normal maps. You'll have to do the first part the same way, but you have to get the absolute value of the rotation degrees of the socket (negative numbers become positive, positive numbers stay positive), and then normalize to range. The rest is the same.
The only other variation we're using is multiple morph targets triggering the same normal map. If you want some of the morphs to affect the normal map's opacity a little less then others, you'll have to multiply the output amount by some less-than-1 number, like 0.8. At the end, you'll have to add all the affecting morph's values together, then clamp the resulting number between 0 and 1. That's all there is to it, really.
For testing, I suggest you create a morph target test animation where you operate all of the morphs individually and in order. You'll be able to clearly see if all of the morphs are working. For me, there was a lot of trial and error involved, but you could minimize this by clearly noting and setting all the socket's rotations.
 |
| Subtle wrinkles on the forehead |
 |
| Less subtle nasolabial folds |
2016/06/11
IT'S HAPPENING!
Hey, it's Geril.
Okay, so a lot of stuff happened in the previous weeks, but we'll write about those in a later post. There is some paid work in our future.
Lussy finished her finals and got the best grade possible. For her exam, she presented some of OLP's assets which were quite unique compared to the average works presented there.
This is about it, see you next time!

The funniest thing is, we were looking at the Greenlight page last night and talking about how it might take some months for us to get greenlit (we were at 35%). Then this morning, an e-mail came that it happened. It was unusually easy to get out of bed afterwards.
The only question remaining is how to release the game legally while still making a profit. Regardless, we're happy that we made it even with our abysmal marketing skills.
A big thank you to everyone who helped us achieve this!
(we're working on the tutorial for the dynamic normal maps, but we're doing lots of other things, too, so please, be patient)
Okay, so a lot of stuff happened in the previous weeks, but we'll write about those in a later post. There is some paid work in our future.
Lussy finished her finals and got the best grade possible. For her exam, she presented some of OLP's assets which were quite unique compared to the average works presented there.
This is about it, see you next time!
...
Oh man, it almost slipped my mind..
LEMNISCATE HAS BEEN GREENLIT!

The funniest thing is, we were looking at the Greenlight page last night and talking about how it might take some months for us to get greenlit (we were at 35%). Then this morning, an e-mail came that it happened. It was unusually easy to get out of bed afterwards.
The only question remaining is how to release the game legally while still making a profit. Regardless, we're happy that we made it even with our abysmal marketing skills.
A big thank you to everyone who helped us achieve this!
(we're working on the tutorial for the dynamic normal maps, but we're doing lots of other things, too, so please, be patient)
2016/05/27
NeoFur!
Hi! It's Geril.
Because Lussy is 120% preparing for her finals, Lemniscate's development is going slower than usual. But in the meantime, I've had time to try out a new technology that I've wanted to try for a long time. It's called NeoFur by Neoglyphic. Because all of OLP's player characters have fur and fluff, this plugin is perfect for us.

For now, only Cole the bobcat has a presentable coat of fur applied. It would be a lot better with a fur pattern map, but Lussy is busy so it'll have to wait.

According to our experience with NeoFur, it really is the best when used as a fur effect (because, of course, we've tried to use it on other things, too, like hair). However, it also looks decent for things like fluffy carpets or grass.

The fur effect is very costly graphically, especially when using more shells (70<), but using proper LODs helps solve this problem.
We couldn't make animations work with NeoFur yet, but we're working on it. We can watch the animated meshes with fur in the editor frame by frame though. We're looking forward to solving this issue, because the preview looks promising.


Apart from this, there are lots of things going on, for example, we may begin to publish posts on other sites, too. Nothing is decided yet, but it feels like our work up to this point is finally going to pay off.
After Lussy's finals, we'll get back to working on Lemniscate again!
Because Lussy is 120% preparing for her finals, Lemniscate's development is going slower than usual. But in the meantime, I've had time to try out a new technology that I've wanted to try for a long time. It's called NeoFur by Neoglyphic. Because all of OLP's player characters have fur and fluff, this plugin is perfect for us.


As you can see on the comparison screenshots, the fluff and the beard improves the character's appearance greatly. We can control the fur's length, density, and how much gravity, wind and force fields affect it. It's fun to tinker with and makes things really interesting visually. For example, we can even make Cole's beard grow during the game.
 |
| so majestic |

The fur effect is very costly graphically, especially when using more shells (70<), but using proper LODs helps solve this problem.
We couldn't make animations work with NeoFur yet, but we're working on it. We can watch the animated meshes with fur in the editor frame by frame though. We're looking forward to solving this issue, because the preview looks promising.


We can only recommend the NeoFur plugin for anyone making fur-coated beings in Unreal 4. It's really worth it (it's only $20!).
Apart from this, there are lots of things going on, for example, we may begin to publish posts on other sites, too. Nothing is decided yet, but it feels like our work up to this point is finally going to pay off.
After Lussy's finals, we'll get back to working on Lemniscate again!
2016/05/11
Dynamic facial normal maps!
Hiya!
We've been working on ideas for Lemniscate, and we were reminded of something we've wanted to try doing for a long time: dynamic facial normal maps tied to morph targets. You know: when a character pulls up an eyebrow and wrinkles appear on his forehead, and the like. It took us about a single workday to implement this using UE4 Blueprints (maybe eight hours including creating the normal maps).
We don't want to spoil anything of Lemniscate, so we've applied this technology to one of our characters from OLP, Beat. She hasn't had a singing video yet, so with this, all of the characters have lip-sync videos where they make fools of themselves.
This animation isn't final or fully detailed, the body animation is still in progress so this version is made of recycled, already existing animations. Oh, by the way, we've also made the texture based eyes work.

If you're interested, we can probably make a quick tutorial on how to make dynamic normal maps (EDIT: here it is) and texture based eye movement work in UE4 Blueprints.

We've been working on ideas for Lemniscate, and we were reminded of something we've wanted to try doing for a long time: dynamic facial normal maps tied to morph targets. You know: when a character pulls up an eyebrow and wrinkles appear on his forehead, and the like. It took us about a single workday to implement this using UE4 Blueprints (maybe eight hours including creating the normal maps).
We don't want to spoil anything of Lemniscate, so we've applied this technology to one of our characters from OLP, Beat. She hasn't had a singing video yet, so with this, all of the characters have lip-sync videos where they make fools of themselves.
This animation isn't final or fully detailed, the body animation is still in progress so this version is made of recycled, already existing animations. Oh, by the way, we've also made the texture based eyes work.

The quality of this gif isn't great, but you can hopefully see how the normal maps change. We should really make some older characters, this would look perfect on them.
If you're interested, we can probably make a quick tutorial on how to make dynamic normal maps (EDIT: here it is) and texture based eye movement work in UE4 Blueprints.
Just to make it clear, we're progressing with the development of Lemniscate. This is one of the rooms (the staff quarters):

2016/04/18
See Lemniscate's ship in 3D!
Hi!
We've uploaded a new model to Sketchfab: now you can see the game's ship in 3D!
You can click on the annotations to take a simple tour, but you can also explore it yourself. We recommend using the first person control mode for this, and adjust the walk speed with the mouse wheel, or else you'll fly right through the ship.
This model isn't exactly like the in-game map - we had to leave most of the props so we could upload it to Sketchfab. We've halved texture sizes, left some out, but it might still be tough for SF's engine to display it in a browser. It's still amazing what this engine can do in a browser window.
The rooms' shapes and sizes were exported directly from UE4 BSPs, so until we release the game, this is the closest you can get to exploring the ship.
In other news, our Greenlight campaign is progressing fairly well, considering we suck at marketing. Seriously. We've visited forums and wrote posts to get more votes, but I guess we're not pushy enough to be successful marketers. Also, there are a lot of people who want to talk to us and who we need to talk to, and it's wearing us both out. We're not very good at social situations either, so instead of feeling tired because of 14-hour days, we feel tired because we had to talk to three people in a single day instead of just one. Oh, the struggle.
Keep the votes flowing!
2016/04/14
OuterLine: Lemniscate
Good news!
We've finally launched our Greenlight campaign. You can vote for us here
So the final name of Project Blind is OL: Lemniscate.
To be honest, we wanted to do a flashier reveal of the OL abbreviation's true meaning, but... it's not flashy. It stands for OuterLine. It's basically the universe which we have created that houses all of our game ideas (for now). So, due to financial constraints and to our limited experience with game development, it so happened that Lemniscate will be our first released game - after it got through Greenlight (so, please!).
We've also changed our team name to ExceptionGate, and changed the blog title accordingly. And created a new Facebook page. And now we're hoping our likers will slowly trickle over to it. wink wink
The last few weeks were a mess of trying to properly record footage from Unreal 4 and video editing. In the final days we chose to record footage with the built-in matinee recorder, but that makes gameplay really hard so there are some lower quality clips in the trailer from earlier screen recordings. Also, we're not good at trailers. (actually we've figured it out: it's magic, and we're muggles) We've managed to leave out most of the gameplay we've implemented from the video. We still hope it catches some people's eyes and makes them read the description and take a look at our gifs. Seriously, we're better at making gif posts.Just look at the gif posts. Don't judge from the trailer.
Anyways... we're considering crowdfunding. We're short on money, and currently this project doesn't generate any profit. Using free software means we don't have to pay for licenses, but even with minimal expenses.. we have to eat something. The downside of crowdfunding is that taxes are ridiculous.

And now it's the middle of the night, so we're going to sleep. In the next few days, I'll sit back, relax and watch the votes flow in. Hopefully.oh crap, I have finals And Geril's going to work on a Sketchfab model for the Greenlight campaign. Because he's a workaholic.
The new model for Lemniscate, of course, will fit right in with our previous works in our Sketchfab gallery. Such colorful and bouncy.... spaceship. Yeah.
G'night!
We've finally launched our Greenlight campaign. You can vote for us here
So the final name of Project Blind is OL: Lemniscate.
To be honest, we wanted to do a flashier reveal of the OL abbreviation's true meaning, but... it's not flashy. It stands for OuterLine. It's basically the universe which we have created that houses all of our game ideas (for now). So, due to financial constraints and to our limited experience with game development, it so happened that Lemniscate will be our first released game - after it got through Greenlight (so, please!).
We've also changed our team name to ExceptionGate, and changed the blog title accordingly. And created a new Facebook page. And now we're hoping our likers will slowly trickle over to it. wink wink
The last few weeks were a mess of trying to properly record footage from Unreal 4 and video editing. In the final days we chose to record footage with the built-in matinee recorder, but that makes gameplay really hard so there are some lower quality clips in the trailer from earlier screen recordings. Also, we're not good at trailers. (actually we've figured it out: it's magic, and we're muggles) We've managed to leave out most of the gameplay we've implemented from the video. We still hope it catches some people's eyes and makes them read the description and take a look at our gifs. Seriously, we're better at making gif posts.
Anyways... we're considering crowdfunding. We're short on money, and currently this project doesn't generate any profit. Using free software means we don't have to pay for licenses, but even with minimal expenses.. we have to eat something. The downside of crowdfunding is that taxes are ridiculous.

And now it's the middle of the night, so we're going to sleep. In the next few days, I'll sit back, relax and watch the votes flow in. Hopefully.
The new model for Lemniscate, of course, will fit right in with our previous works in our Sketchfab gallery. Such colorful and bouncy.... spaceship. Yeah.
G'night!
2016/03/12
Feature Update!
Hi!
It's time for another update on how the development is going. We've, since the last update, added:

Objects that can be picked up and thrown, and if they are thrown with enough force, they break/explode. These are not using UE4's built in fracture mesh. They spawn gibs and particle meshes on impact, destroy themselves and of course, make noise, too.
We can't show you yet, but the monster can now react to noises. It's possible to distract him with throwing an object somewhere far, and if the monster is close enough to hear it (or it is loud enough), he will inspect the sound's location.
---


In other news, we're preparing for our Steam Greenlight campaign, and trying to find legal ways to release the game (we're in Hungary... it's not easy)
This is all for today, see you next time!
It's time for another update on how the development is going. We've, since the last update, added:

Objects that can be picked up and thrown, and if they are thrown with enough force, they break/explode. These are not using UE4's built in fracture mesh. They spawn gibs and particle meshes on impact, destroy themselves and of course, make noise, too.
We can't show you yet, but the monster can now react to noises. It's possible to distract him with throwing an object somewhere far, and if the monster is close enough to hear it (or it is loud enough), he will inspect the sound's location.
---

The doors also got an upgrade. The door system itself changed, now every door uses a certain color, and the corresponding colored card opens the door. They also got this flashy sign on the buttons that shows if they are locked or not.
---

We've added a note system to the game. Every in-game character has a Personal Assistant Device (P.A.D) that they use to take notes with. The P.A.D assigns these notes to the locations they were recorded at inside the ship. If you find someone's P.A.D, their notes will become visible and readable.

Like this poor fella's.
And this is how the note looks if you activate/deactivate the found P.A.D.
---

We've added visible points to the spine of the monster, so he can be seen from farther away.
---


One of the biggest features we've added is the fire detection system in the ship. If there is a fire, the sprinklers will activate (if the water system is active, of course), and put it out over time. The fire can also kill the player if he stays in it for long enough. Also, if the player stands under the sprinkler, he gets wet and the camera also gets an effect that makes it hard to see. It fades over time, but while he's wet, electric devices will be dangerous to him.
---

The last thing is the way the day ends. After a set amount of time, time resets, and we've added an effect that sweeps through the ship, representing the time loop starting everything over.

Also, related to this, we've made a clock that shows the current time. This will be the clock that wakes the player every day, and he can also use it to determine how much time he has left of that day.
We're still working on the interface, there are a lot of placeholders and debug stuff there, please excuse the messiness.
We're still working on the interface, there are a lot of placeholders and debug stuff there, please excuse the messiness.
In other news, we're preparing for our Steam Greenlight campaign, and trying to find legal ways to release the game (we're in Hungary... it's not easy)
This is all for today, see you next time!
Subscribe to:
Posts (Atom)