As I looked back on our previous posts, I realized I promised to make more tutorials about UDK and game development in general. The reason why we didn't make any is because it's hard to teach what we are still learning. But I'd like to share something that I think not many people know.
Blender3D can bake many kinds of textures, so we don't need ZBrush, 3D Coat or Blacksmith to create materials (even tileable ones). But as Blender is a free software, we have to work twice as hard.
I'm trying to make this tutorial as in-depth and easy to understand as possible, because I tend to omit important parts. If I'm wrong about something, please tell me in the comments, you know that I'm still learning, too.
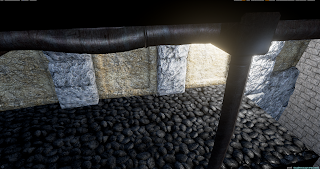
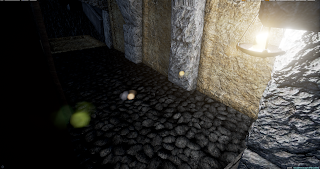
So, in this tutorial, we're going to show you how we create tileable materials; in this case, a cobblestone surface. This is the result, rendered in Unreal 4:
---

First, launch Blender (we're using 2.76 right now) and delete the starting box. Then add a Plane mesh using the Add menu [SHIFT + A] - this is going to be the surface to which we are projecting our texture. We're using the upper right area of the editor as a UV/Image editor, of course you can use any other area, too.
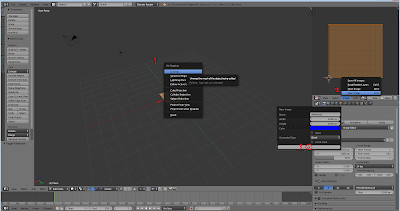
Press [TAB] to go into the plane's mesh edit mode that has all of the vertexes selected by default. Press [U] and select Unwrap from the menu - you just created a UV map for the plane. You can see it in the UV/Image editor area. This is where your texture will appear after baking.
In that area, create a new image in the image menu. Choose the right resolution for your texture, based on how important it is going to be in the game. We use 2048x2048. The color and name parameters are not important.

Exit the plane's edit mode [TAB], and add [SHIFT + A] an ico sphere (this will be the first stone). Push [G] and then [Z] to move it along the Z axis above the plane. Push [S] to re-size the sphere, shrink it to the size of the stone you want, relative to the texture's size (the plane).

Exit the plane's edit mode [TAB], and add [SHIFT + A] an ico sphere (this will be the first stone). Push [G] and then [Z] to move it along the Z axis above the plane. Push [S] to re-size the sphere, shrink it to the size of the stone you want, relative to the texture's size (the plane).

Open the specials menu with [W]. You'll find a "Smooth" option, with that, you can smooth your randomized sphere so it looks more like a rock. Once again, you can adjust it in the left-side menu, or just keep smoothing it over and over. With this method, you can randomize rock easily. (I add the other rock this way, too) Move your rock to one of the corners, I moved mine to the lower right. To move the mesh on the grid, hold down the [CTRL] key, that way you can align it perfectly with the corner.

Duplicate the rock with [SHIFT + D], and put a duplicate in each of the corners using the grid. Create some new ico spheres, and make new rocks from them using the previous method. Select some rock with area selection [C] (if you didn't select all the vertexes of a mesh with [C], push [CTRL+L] to select the remaining vertexes on them as well), and arrange them as a group, re-size them [S], rotate them ([R] to rotate on the current view's axis, [R] again if you want to rotate them on all the axes).
Duplicate them, and to make it more random, set the pivot point to Individual Origins, so that when you rotate or re-size them, they will all rotate and re-size individually (not as a group). Just make it seem as random as possible, customize them, but it's important that, except for the rocks in the corners, no other rock should touch the plane's edges.
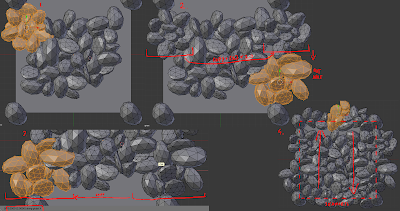
Pick a group of rocks, preferably one that is roughly as wide as it is long. Place it to one edge of the plane, so that it touches the rock in the corner and goes off the edge a bit. After that, duplicate it and place the duplicate on the opposite edge, using the grid. The easiest way is, say you want to move them from the left side edge to the right side one. You'd use grab [G], and to move them on the X axis, push [X] after [G]. Then just type in "-2". This moves the group two units on the X axis - right onto the other edge of the plane. For the top and bottom edges, of course you'd use [Y] instead of [X], for the Y axis. Do this for every edge, the point is that you should fill all the opposing edges with the same models, so that in the end it becomes tileable. It's a little tricky and tedious, and requires a lot of patience, but if I could do it, you can, too.

After our rocky surface is done, and there are no holes remaining, exit edit mode [TAB] and move it to about one unit above the plane. Then duplicate it, and move the duplicate a little closer to the plane (it still shouldn't touch it!). You should also rotate the duplicate 90 degrees ([R], [Z], 90 - this shortcut rotates it on the Z axis 90 degrees) Another important thing is to set the rocks' flat shading to smooth on the left side toolbar.
Select the two rock objects and the plane, in this order; the plane should be the last one [SHIFT + Right Mouse Button] for multiple selection). In the Properties section on the right side, choose the photo icon - that is the Render tab. There you can find the Bake sub window, where you can adjust the bake settings. First, check "Selected to Active" and "Clear". Margin can be left on 16, but I've had bad experiences with margins and tiling, so I recommend setting it to about 4. Set Bake mode to Normals. Now let's bake!

Well now, if the rendered image doesn't look healthily blue, but rather greenish or orange, our Plane's surface points in the wrong direction. In this case, go to the plane's edit mode, select all of the vertexes, and look for a "Flip Direction" button on the right-side toolbar. That should flip the plane's direction. Select the rocks and the plane in the right order, and try again. It should look normal now (pun intended). If you're happy with it, you can save it in the UV/Image editor window with Save as Image, I recommend saving as either PNG or TGA. When you've saved it, let's go back to baking - select Displacement in the Bake menu, and Bake again.

You shouldn't have trouble with the plane's direction again if the normal map came out good. Just bake it and save it next to the normal map you created. After that, repeat the process for Ambient Occlusion as well. You can do a little touch-up in Photoshop or GIMP, like filling in holes between rocks, but be careful, and always keep the original file. You can set the contrast higher on the Displacement map though, it makes the material look deeper. (Don't mind the Hungarian stuff on the pic)

Let's import the pictures into Unreal 4. Select one of the imported pics, and make a material based on it. Put the remaining pictures in that material as well. Use something appropriate as a color texture. Using the color texture as a DetailNormal map is also a good idea.

This is the last step, messing around with the material settings. It's a little hard to explain this in text, I hope that the picture is understandable. I'll try to write the instructions down as best as I can, though, because I'm not that lazy.
Connect the Displacement's red output to a BumpOffset node [B], then duplicate it and repeat. Create a TexCoord Node [U], and set it to U:2 and V:2. Connect this to the second BumpOffset Coords node's input. Connect the first BumpOffset node's output to the inputs of the textures we created. The second BumpOffset node (with the TexCoord) should be connected to the color texture, and its detailnormal map.
Multiply [M] the Displacement map with the rock texture. Connect this to Basic Color. If it's too dark, leave out the multiply node, but I think it improves the visuals quite a bit. Our normal map would be boring on its own, so you should also add the color map's detailnormal to it (multiplying its texture coord so it becomes more dense).
Create a BlendAngleCorrectedNormal node (that's a fancy way of saying MAKE A MORE DETAILED NORMAL) (okay.. there is a reason why it's called that, but.. let's just continue, okay?) Put this node next to the normal maps. Connect our baked Normal map to Base Normal, and the DetailNormal's to AdditionNormal. Connect this fancy node to the Normal input. And finally, connect the Ambient Occlusion's output to...... the Ambient Occlusion input. Yes, there is an easy step in this.
All that is left is to save the material and try it out. You should adjust the BumpOffset, Roughness and Specular, but I can't help you there, it all depends on what looks good with the color map and environment you are using.
---
This wraps up the tutorial. If you have any questions or requests, leave them in the comments below! I'll be happy to create a tutorial on anything, as long as I know what I'm doing.